Inventory
proTrack products and per-site stock, set reorder points, watch low-stock alerts, run bulk actions and AI tools, and import stock reliably.
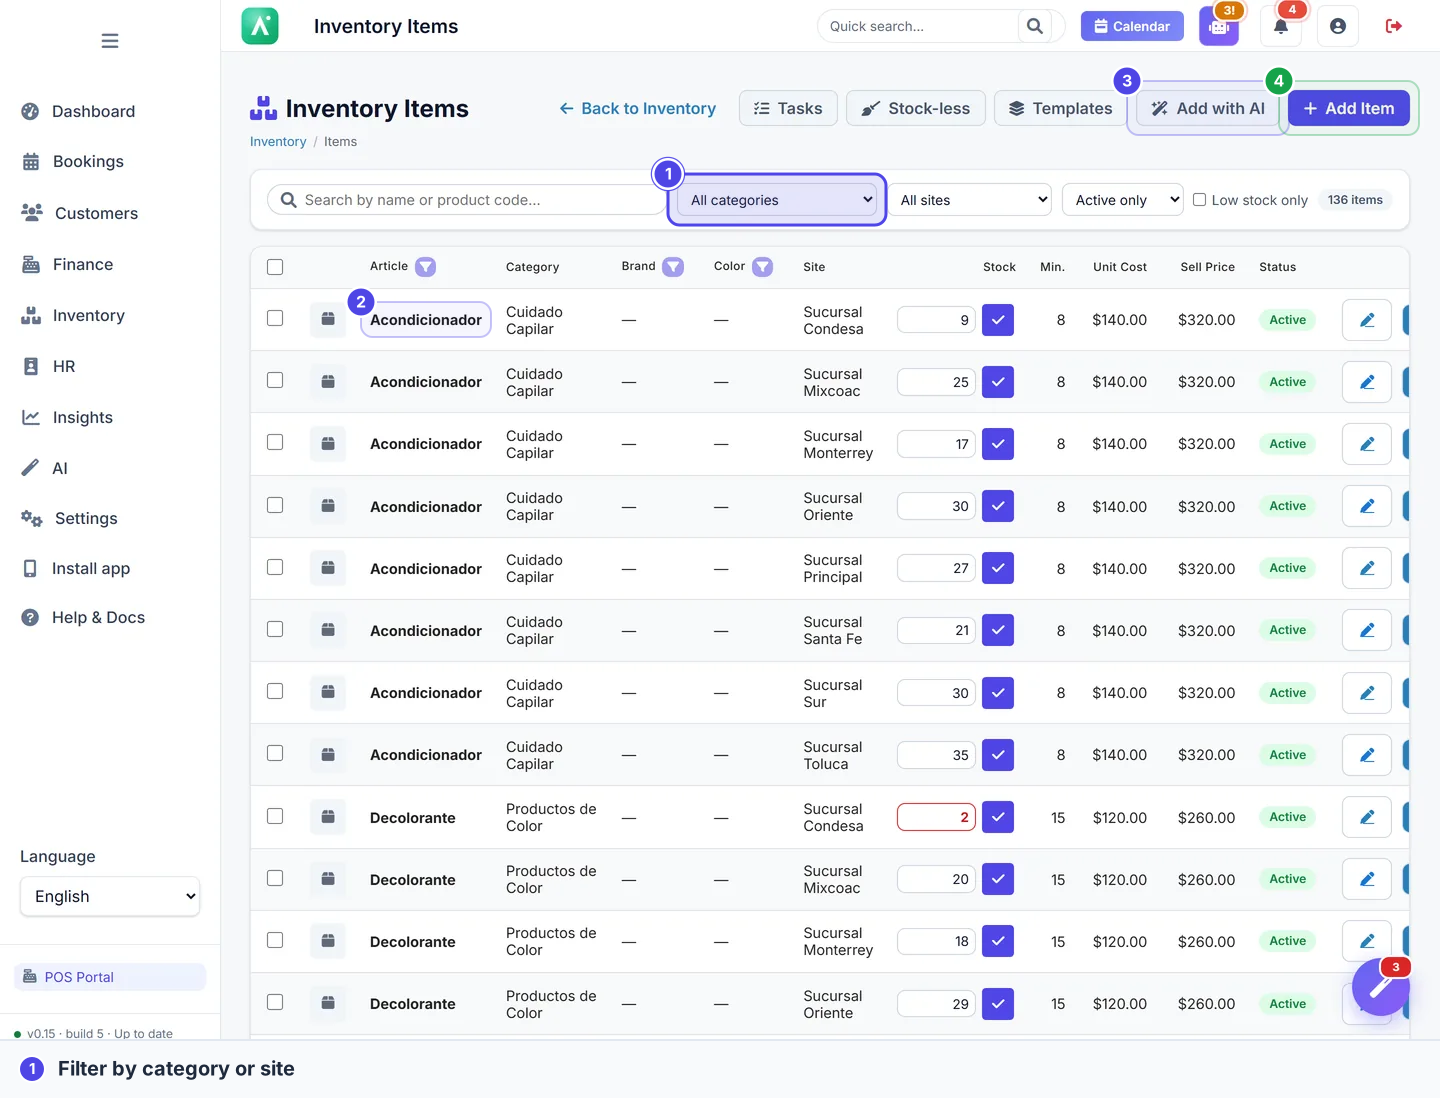
Inventory keeps a live count of every product you stock — supplies, retail items, consumables — with its cost, price, and reorder point in one place. The number that matters in a multi-location business is not a single global total but how much you hold at each site (location). Apolaris AI tracks stock per site, so the dashboard and the items list always reflect what is on the shelf at the locations you can see — and update as you sell, receive orders, and reorder.
How stock is tracked: per site
A product is an item (a catalog record for your whole organization), but its quantity lives in a separate per-site stock record. The same product can sit at 12 units in your downtown site and 3 at the mall kiosk — two stock rows, one item.
This matters everywhere in the module:
- The Items list shows one row per site stock record, so you see the count at each location, not one merged figure.
- The Inventory Dashboard aggregates and breaks down stock by site.
- Low-stock is judged per site (see below), so a site can be flagged short even while another has plenty.
What you can see is scoped to your visible sites: a domain manager sees every site in the organization; everyone else sees the sites of their own employee record plus any sites explicitly granted to them. See Organizations & sites and Switching sites.
Stock arrives at a site in two ways: you record it when adding/importing an item, and it is incremented automatically when a material order is received at that site. Selling a product at the till draws it back down — see Sales & point of sale.
Who can do this
Inventory access is granular per privilege. A domain manager (the is_manager flag) always passes every check below; a non-manager needs the specific privilege noted.
| Action | Who can do it |
|---|---|
| View the Items list (scoped to visible sites) | Any signed-in employee |
| Inventory Dashboard and Categories | Manager, or a non-manager with can_manage_settings |
| Add Item, Add Category | Manager only |
| Add with AI (site import), Stock templates | Manager only |
| Bulk actions and AI tools on the Items list | Manager only |
| Import, bulk actions, and AI tools on the HQ / central warehouse catalog | Manager, or a non-manager with can_manage_material_requests |
There is no "inventory clerk" role; access is the sum of these booleans on the employee's user. The dashboard and Categories pages are the only inventory screens a privilege admin can delegate below manager level, via can_manage_settings.
Adding items, importing with AI, stock templates, bulk actions, and the AI tools are manager-only. A non-manager — even one with can_manage_settings — can open the dashboard and categories but will not see the Add Item / Add with AI / Stock templates / bulk entries and is blocked if they reach those URLs directly.
Items and categories
Each product is an item with the details that matter for running the business:
- Name — the product name.
- Brand — the manufacturer or label.
- Color — useful for products that come in variants.
- SKU — your product code, handy for quick lookups and ordering.
- Unit cost — what you pay for it (used to value your stock).
- Selling price — what the customer pays.
- Minimum stock — the per-site reorder point that triggers a low-stock warning (see below).
- Expiry date — an optional best-before/use-by date for perishable stock.
- Photo — a thumbnail so staff pick the right item at a glance and when building orders.
Group items into categories (for example "Supplies", "Tools", "Retail") to keep long lists tidy and to read your dashboard by type.
An item can be discontinued by marking it inactive. Inactive items are hidden from the Items list and the dashboard by default; show them again with the Show inactive toggle (?show_inactive=1 on the list).
Filtering and finding items
The Items list supports inline column filters and a search box: filter by name, category, brand, color, or site, or pick a single site to narrow the view. The search box matches name, brand, category, and site name.
Add an item
Manager only.
- Open Inventory → Add Item from the sidebar.
- Enter the name, choose a category, and set the unit cost and selling price.
- Add the brand, color, and SKU as needed.
- Set the minimum stock (the per-site reorder point) and, if relevant, an expiry date.
- Upload a photo (optional but recommended).
- Save.
Low-stock alerts and reorder points
The reorder threshold is the item's minimum stock, and it is evaluated per site: a site's stock row is "low" whenever its on-hand count is at or below the item's minimum. The same item can therefore be low at one location and healthy at another.
- The Items list highlights low rows so they are impossible to miss.
- The Dashboard shows a running low-stock count, a per-site low-stock breakdown, and a preview of the items running low (with brand, color, current vs. minimum).
Use this to drive your reorder routine — typically a material order to your HQ / central warehouse — instead of finding out you are empty mid-appointment.
Set realistic minimums based on how fast each item moves and how long a refill takes to arrive. Because the threshold applies at every site, a busy flagship and a quiet kiosk share the same number — pick a level that protects your highest-turnover location, or split fast and slow movers into separate items if their pace differs sharply.
Inventory dashboard
Manager, or a non-manager with
can_manage_settings. Figures are scoped to your visible sites.
The dashboard gives you the at-a-glance picture, driven off the same per-site stock the Items list uses:
- Distinct items stocked somewhere you can see, and a category count.
- Total inventory value (unit cost × on-hand, summed across sites) and total selling value.
- Low-stock count — everything below its per-site reorder point.
- Per-site cards — items, total stock, low-stock count, and cost/selling value for each location.
- Stock by category and stock by site charts, plus a top low-stock chart comparing current vs. minimum.
- Latest material orders — recent franchise orders, linking the dashboard to the ordering workflow (a received order is what increments site stock).
Read total value against your low-stock list: a high value with many low movers usually means cash is tied up in slow stock while bestsellers run dry. Use the per-site breakdown to rebalance.
Bulk actions on many items at once
Manager only on the Items list. On the HQ / central warehouse catalog, manager or a non-manager with
can_manage_material_requests.
When you need to change dozens or hundreds of products at once — clean up after a price rise, retire a discontinued line, or attach photos to a whole brand — work them in bulk instead of one row at a time. Bulk actions are available on both the Items list and the HQ / central warehouse Catalog; they behave the same on each surface, only the target stock differs.
Selecting rows
- Tick the checkbox on any row to select it.
- Hold Shift and click a second checkbox to select the whole range between the two.
- Use Select all matching to select every row that matches your current filters and search — not just the ones on screen — so a 600-row filtered list can be acted on in one go.
A bulk action bar appears once at least one row is selected, showing the count and the action buttons.
Filter or search first, then Select all matching. That way a bulk edit or delete is scoped exactly to the products you mean — for example, every item of one brand, or everything in one category.
Bulk delete
Select the rows you want to remove and choose Delete. You are asked to confirm before anything is removed. Deletion is scoped to the items you can see (your visible sites on the Items list; your warehouse on the Catalog), so you can never delete a product outside your reach.
Bulk edit
Select rows and choose Edit to change several fields across all of them at once:
- Status — activate or discontinue the selected items.
- Category, Brand — reassign them in one move.
- Price, Cost, Stock — update the number, with a choice of mode:
- Set — overwrite with the value you enter.
- Increase — add the value to the current number (for example, raise every price by 10).
- Decrease — subtract the value.
Only the fields you fill in are changed; leave a field blank to leave it as it is.
Bulk-assign images by filename
If you have a folder of product photos named to match your articles, choose Images in the bulk bar and upload them. Each image is matched to an item by its filename and attached automatically, so you can photograph a whole shelf and assign the lot in one upload instead of editing each item.
AI tools (review before anything is applied)
Manager only on the Items list. On the HQ / central warehouse catalog, manager or a non-manager with
can_manage_material_requests.
The AI tools take the products you select and propose improvements for you to review. Nothing is ever written to your catalog until you look over the suggestions and click Apply — you can uncheck any suggestion you disagree with, and discarding the whole batch changes nothing. Open them from the bulk action bar after selecting rows.
| Tool | What it proposes |
|---|---|
| Categorize & clean up | Tidies names, fills in or corrects categories, and standardizes messy data across the selected items. |
| Suggest pricing | Proposes selling prices based on cost and the rest of your catalog. |
| Generate descriptions | Writes a product description for each selected item. |
| Find duplicates & gaps | Reports likely duplicate products and items missing a SKU, image, or price — with one-click follow-up actions scoped to just the flagged items. |
| Recognize photos | You upload product photos and the assistant matches each one to the right article and attaches it (see below). |
Every AI tool except Find duplicates & gaps uses the AI assistant, which your organization must have enabled. Find duplicates & gaps is a plain, rules-based report and always works. The AI text follows your organization's language.
Review and apply
- Select the items, then pick a tool from the bulk bar.
- The assistant works through the selection and shows a review screen of proposed changes.
- Untick anything you don't want.
- Click Apply to write the approved changes. (Until you do, your catalog is untouched.)
Recognize photos
- Select the article(s) you want to illustrate and choose Recognize photos.
- Upload your product images.
- The assistant compares each photo to your articles and matches it to the best fit, attaching the photo when it is confident enough.
- When it finishes you get a matched / unmatched summary, and you can download a spreadsheet of the photos it could not place so you can rename or re-upload them.
AI-assisted stock import
Already have your products in a spreadsheet? Let the AI do the typing instead of keying in every row. There are two import paths with different targets — pick the one that matches where the stock lives. Both handle files of any size: small files are reviewed and imported on the spot, while larger files run in the background so you can keep working (see Reliable large-file import below).
Import into your sites (Add with AI)
Manager only. Writes per-site stock.
- Go to Inventory → Add with AI.
- Upload an Excel (.xlsx) or CSV file.
- The assistant reads the columns and proposes how they map to your item fields — name, SKU, category, quantity, cost, and price. Cells it cannot parse (a quantity or price) are flagged and treated as 0.
- Review each row: create a new article, skip it, or map it onto an existing item (matches by SKU or name are pre-selected).
- Choose at least one site to receive the stock — none is pre-selected, and the import will not run until you pick one.
- Confirm to import. The quantity from each row is added to the chosen sites' stock.
Your column choices are remembered per organization, so the next import maps itself.
If you do not select a site, the import is refused with "Choose at least one site to add the stock to." Choosing several sites adds the same quantity to each of them.
Import the HQ / central warehouse catalog
Manager, or a non-manager with
can_manage_material_requests. Writes central warehouse stock, not site stock.
A separate AI import loads your HQ / central warehouse catalog instead of site shelves. Reach it from Franchise / HQ → Import with AI (it sends you to the right warehouse, or asks you to pick one if you have more than one). The flow is the same upload-and-review, but quantities land in central warehouse stock that sites then order from. This path requires the material requests module to be enabled. See Material ordering (franchise).
Reliable large-file import
Large spreadsheets used to be risky to import. Now there is no row limit, and the size of your file decides how it runs:
- Small files import inline: you confirm the column mapping and step through the per-row create / match / skip review, then import there and then.
- Large files run as a background import. You confirm the mapping (and, for site imports, the target sites), click Start import, and a live status page opens. It shows progress as the rows are processed, with a per-row accounting of how many were created, matched/updated, skipped, and not imported.
When a background import finishes, any rows it could not import are collected into a downloadable "not imported" spreadsheet. Open it, fix the flagged rows (a bad price, a missing name), and re-upload just those — so a few bad rows never block the rest of the file.
You don't have to wait on the status page. The import keeps running on its own; come back to the Tasks panel (below) any time to check progress or grab the not-imported spreadsheet.
If you start a large import but never finish setting it up, that abandoned draft is cleaned up automatically after a while, so it won't clutter your Tasks list forever.
The Tasks panel
The Tasks button (on the Items list and the Catalog) opens a combined list of your inventory background jobs — both imports and AI tool runs — in one place. Each entry shows its status and progress, with an Open link to its detail page: the import status page (with the not-imported download) or the AI review screen.
You only see jobs you are allowed to see, and they are always scoped to your own organization.
Cancel a running AI job
A long AI run — generating descriptions or recognizing photos for hundreds of items — shows a Cancel button on its status page. Cancelling stops the job but keeps whatever it has already produced, so you can still review and apply the partial results instead of losing the work done so far.
Stock templates
Manager only. Applies to sites.
A stock template is a reusable set of articles you can apply to one or more sites in one click — a "starter kit" for opening or restocking a location.
- Open Inventory → Stock templates and click to create a New template.
- Add the articles by hand, or use the AI file import to upload an Excel/CSV and let the assistant fill the list for you to review. Nothing is saved until you review the rows and click Save template.
- Save the template.
- Apply it: choose one or more sites, and each article's default quantity is added to those sites' stock. New articles that don't yet exist in your catalog are created automatically.
Stock templates apply to sites only — they create or top up site stock, never central warehouse stock, even though the Franchise / HQ menu lists the same Stock templates link. That second entry is a convenience pointer to the same site-apply screen, not a warehouse-provisioning tool. To load a warehouse catalog, use Import the HQ / central warehouse catalog above.
Cross-data impacts
- Selling a product at the till reduces the site's stock and feeds Analytics & Data Explorer; accurate unit cost is what makes stock value and margin correct.
- Receiving a material order increments stock at the receiving site — that is how incoming product physically appears. See Material ordering (franchise).
- Discontinuing an item hides it from lists and dashboards but does not delete its history.
Tips
- Keep unit cost accurate — it powers stock valuation and the margin you see in Analytics & Data Explorer.
- Use clear, consistent SKUs so reordering, AI-import matching, and lookups stay quick.
- Photos cut picking errors at the front desk and during stock checks.
- Filter first, then Select all matching — it makes bulk edits and AI tools land on exactly the products you intend.
- Review every AI suggestion before you Apply; the assistant proposes, you decide.
Ready to restock? Check low-stock items as part of your daily prep — see Open up for the day — and place a material order to top up the short sites.
Related
- Sales & point of sale — products you sell at the till draw from site stock.
- Material ordering (franchise) — order from the HQ / central warehouse, and receive stock at a site.
- Organizations & sites — how per-site scoping works.
- Analytics & Data Explorer — track stock value and product performance over time.