Users & privileges
proCreate login accounts and set granular, per-privilege permissions — including who can manage other users, which sites each person sees, and whether they live in the employee portal.
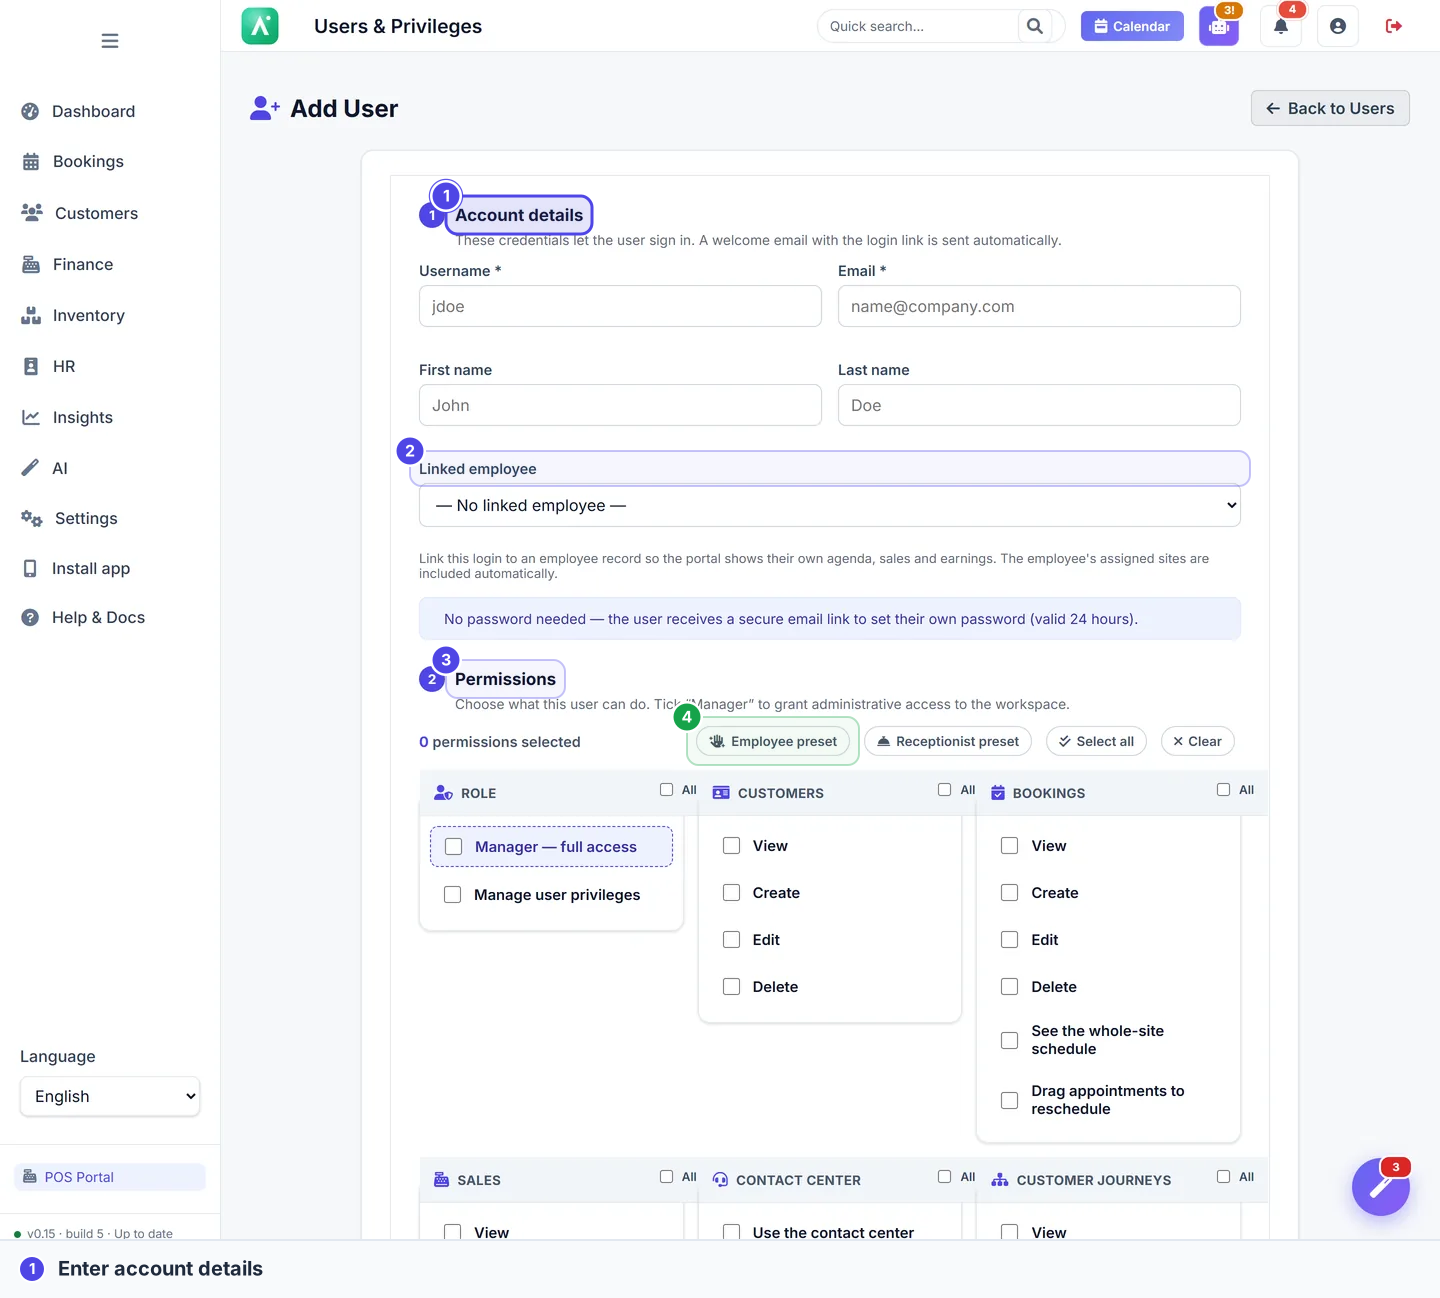
A user account is the login that lets someone sign in to Apolaris AI. What they can see and do once inside is controlled by granular privileges — individual on/off permissions set per person. There are no fixed "roles" baked into the product: you compose each account from the exact permissions that person needs. This is least-privilege security in practice — payroll, pricing, reports, and other sensitive areas stay locked down while everyone can still do their job.
A user (a login) is layered on top of an employee (the HR record), but the two are not the same thing and a user does not require a linked employee. See Employees, users & permissions for the distinction.
Who can do this
User management is gated by can_admin_privileges():
| Who | How they qualify | What they can do |
|---|---|---|
| Domain manager | is_manager |
Create/edit any user, grant any privilege including the protected role flags |
| Privilege admin | non-manager with can_manage_privileges |
Create/edit users and grant most privileges, except the two protected role flags (see The escalation guard) |
| Everyone else | — | No access to the Users area |
You reach the area at /user_privileges/ ("Users") from the sidebar.
Create a user account
- Open the Users page and click New user (the "Add user" form at
/users/add/). - Enter a Username — this is required and is the person's sign-in name (for example
jdoe). - Enter an Email — also required. The set-password invite is sent here.
- Optionally enter a First name and Last name.
- Optionally choose a Linked employee. This field is optional — its default is "— No linked employee —". Linking a login to an employee record makes the portal show that person's own agenda, sales, and earnings, and it automatically includes the employee's assigned sites in what the user can see.
- Optionally pick Visible sites (see Per-user site visibility).
- Set the permissions in the grouped picker — start from a privilege template or tick them one by one (see Set privileges).
- Save. Apolaris emails a set-password invite so the person creates their own password — you never see or type it. The account stays locked until they do.
Link-only passwords mean no shared or written-down credentials. If someone forgets their password, resend the set-password link with the Reset password action on their user row.
Invite and reset emails require your organization's email to be configured. If links aren't arriving, the user is still created — you'll see a warning to resend once email is set up. See Email setup.
Usernames must be unique. If you try to reuse one, the form rejects it with "A user with this username already exists."
Account recovery
If someone is locked out, you can get them back in without recreating the account:
- Forgotten password — use the Reset password action on their row in the Users page. It emails them a fresh password-reset link; you never see or set the password yourself.
- Lost two-factor device — Apolaris platform support can remove a lost two-factor device on request. The account then signs in with its password alone, and is asked to re-enrol two-factor if your organization requires it.
Set privileges
Privileges are set in a grouped checkbox picker, not a raw list of internal field names. Each checkbox has a human-friendly label and is filed under a resource group:
| Group | Example permissions |
|---|---|
| Role | Manager — full access, Manage user privileges |
| Customers | View / Create / Edit / Delete customers |
| Bookings | View / Create / Edit / Delete bookings, See the whole-site schedule, Drag appointments to reschedule |
| Sales | View / Create / Edit / Delete sales, Manage sales |
| Contact Center | Use the contact center |
| Services | View / Create / Edit / Delete services |
| Sites | View / Create / Edit / Delete sites |
| Employees | View / Create / Edit / Delete employees |
| Reports | View reports, Export reports, Use the Data Explorer |
| Settings | Manage settings |
| Inventory | Order material from HQ, Manage the franchise / HQ catalog & requests |
| Loyalty | Enroll customers & redeem rewards, Configure the loyalty program & catalog |
| Discounts | Create discount codes & see their impact |
| Time off | Request time off, Approve time off, See the time-off calendar |
| Employee portal | Use the employee portal, Lock to one workspace, See own earnings, Submit expenses |
To set them:
- Open New user (or click a user to edit them) and find the permission picker.
- Tick the individual permissions that person needs. The counter at the top shows how many are selected.
- Use the All toggle on a group card to turn a whole group on or off, or Select all / Clear for everything.
- Save.
Save clicks with privilege templates: under Start from a template at the top of the picker, click a role such as Employee (basic) or Receptionist and its privileges are ticked for you; then adjust for that person. Every organization starts with twelve default templates and can add its own — see Privilege templates.
For the full list of every permission and exactly what it unlocks, see the Privileges reference.
The "Role" group
Two permissions sit in the Role group and behave specially:
- Manager — full access (
is_manager) grants full domain access: every site, every area, and the ability to grant any privilege. Use sparingly. - Manage user privileges (
can_manage_privileges) lets a non-manager add and edit other users and their permissions — a delegated "privilege admin." Both of these flags are protected by the escalation guard below.
The escalation guard
Apolaris protects exactly two permissions from being handed out by non-managers: Manager — full access (is_manager) and Manage user privileges (can_manage_privileges). Only a real manager (or the platform operator) can toggle those.
This means a privilege admin (someone with can_manage_privileges but who is not a manager) can grant any of the other permissions — even ones their own account doesn't have — but they cannot promote anyone (including themselves) to manager or grant the privilege-admin flag itself. That single guard is what makes it safe to delegate user management below manager level.
The guard is narrow on purpose. It is not a blanket "you can only grant what you hold." A privilege admin who lacks, say, can_explore_data can still grant the Data Explorer to someone else. The only things they cannot delegate are the two protected Role flags. If you need a non-manager to also be able to create managers, they must be made a manager themselves.
Per-user site visibility
If your organization has multiple sites, control which ones each user can see. Visibility is computed automatically and works as a union:
- Managers see every site in the organization, regardless of any grants.
- Everyone else sees the sites assigned to their linked employee combined with any explicit Visible sites grants on the user form. The two sets are merged — a user can therefore see more sites than you explicitly granted, because their employee assignment adds to the list. If the linked employee has no assigned sites (employee site assignment is optional), the union collapses to just the explicit grants — the user sees only the sites you granted.
There are two ways to grant a site:
- On the user form — pick branches in the Visible sites multi-select when creating or editing the user.
- From a site — on a site's detail page you can grant or revoke a specific user's access to that one site (the site access toggle). Note this only manages the explicit grant; access that comes from the employee's site assignment is implicit and stays even if you revoke the explicit grant.
When you link an employee to a new user, that employee's assigned sites are added to the user's visible sites automatically — you usually don't need to grant them again by hand.
Because employee-assigned sites are unioned in, removing a site from Visible sites will not hide it if the user's linked employee is still assigned to that site. To fully scope a user down, also check the employee's site assignments in HR.
The employee portal: two separate switches
The Employee portal group has two distinct permissions that are easy to confuse:
| Permission (UI label) | Field | What it does |
|---|---|---|
| Use the POS | can_use_pos |
Lets the user open the POS workspace (Caja). Additive — they still land in the CRM after login. |
| POS only — no CRM access | pos_only |
Locks the user to the POS; the CRM returns "contact your administrator". Requires Use the POS. |
The Lock to one workspace switch blocks switching in both directions, depending on whether the portal switch is also on:
- Locked + Use the portal on → portal only (the user can never reach the admin back office, even a manager).
- Locked + Use the portal off → management only (the user is blocked from the employee portal).
- Not locked → role-based: the user can move between both.
For a typical front-desk or staff account you'll turn on Use the employee portal and Lock to one workspace together, so they live entirely in Caja. The Employee (basic) and Technician templates do this for you.
Functional and franchise/HQ permissions
Beyond the everyday CRUD permissions, the picker exposes several capability and franchise/HQ permissions that effectively define specialized operators. There is no separate "franchise" or "HQ" role flag — HQ status is simply the franchise permissions below plus a central warehouse for the organization.
| Permission (UI label) | Field | Notes |
|---|---|---|
| See own earnings | can_view_own_earnings |
Portal earnings/bonus screen. On by default. |
| Submit expenses | can_submit_expense |
Submit business expenses for approval from the portal. |
| Use the contact center | can_use_ccaas |
Access the CCaaS inbox. See Contact center. |
| See the whole-site schedule | can_view_site_schedule |
See every employee's appointments at the user's sites (e.g. a receptionist), not just their own. |
| Drag appointments to reschedule | can_drag_appointments |
Drag-reschedule on the calendar; requires booking edit rights. |
| Use the Data Explorer | can_explore_data |
Build ad-hoc reports, scoped to the user's visible sites. See Analytics & reporting. |
| Order material from HQ | can_order_material |
The site side of franchising: buy stock from headquarters for the user's sites. |
| Manage the franchise / HQ catalog & requests | can_manage_material_requests |
The HQ operator: curate the orderable catalog, control HQ stock, and approve/ship incoming orders. See Material ordering (franchise). |
| Enroll customers & redeem rewards | can_use_loyalty |
Site side of loyalty: enroll customers, award/adjust points, redeem rewards. |
| Configure the loyalty program & catalog | can_manage_loyalty |
HQ side of loyalty: configure tiers and the reward catalog for the whole brand. |
| Create discount codes & see their impact | can_manage_discounts |
Create promo/influencer codes and read their impact report. (Applying a code at checkout rides on Manage sales — cashiers don't need this.) |
Franchise and loyalty permissions touch shared data across the organization. A discount code lowers the net revenue your reports count; loyalty points and material orders move stock and balances. Grant the "Manage…" HQ permissions only to the people who run those programs brand-wide.
Tips
- Start small. Grant the minimum, then add permissions when someone actually needs them — or start from a template and trim.
- Be consistent. Give front-desk, staff, and managers the same permission sets so onboarding is predictable; privilege templates exist for exactly this.
- Review periodically. When someone changes roles or leaves, update or disable their account right away.
- Delegate safely. You can hand off day-to-day user management with Manage user privileges without giving away manager access — the escalation guard keeps the two role flags off-limits.
See also: Employees, users & permissions, Onboard a new employee, and the Privileges reference.